
Overtone Sliders
Contents
An Overtone Slider is a visual tool that is laid over the spectrogram. A slider consists of lines that each represent a specific frequency. The distance between the lines corresponds to the harmonic series of a given fundamental. Overtone Sliders can be used to learn the harmonic series for each tone, and to analyze the harmonic content of a recording. They can also be used to transcribe the notes in a recording. Another use is to illustrate the role of overtones for composition and music theory. Overtone Sliders may also be called Note Sliders, depending on the context of use.
The following image shows an Overtone Slider with four harmonics, where the fundamental frequency is 110 Hz. On the piano, this would be an A. Each harmonic has a frequency that is a multiple of the fundamental. Therefore, the second harmonic has a frequency of 2*110 Hz = 220 Hz, the third one 330 Hz, and so on.
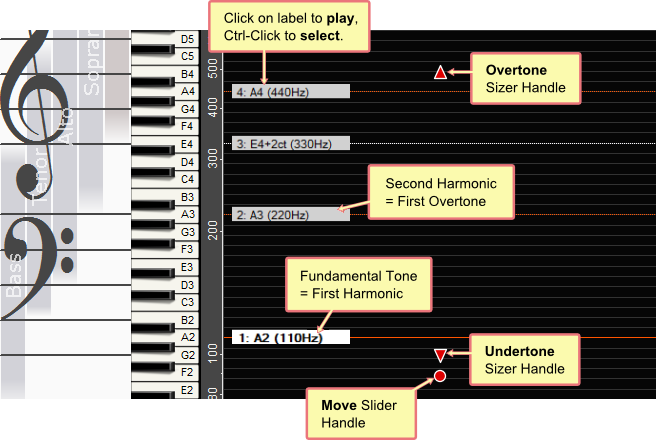
The image also shows the basic elements of the slider, including the controls that you can use to manipulate an Overtone Slider with the mouse:
- Slider Labels
-
The labels show the number of the harmonic, and optionally the note name and frequency. This appearance can be adjusted on the Note Sliders settings page, and on the toolbar.
You can click on Labels to play them. The instrument used for playing them can be selected by the “Overtone Instrument” on the Playback Settings.
You can select one or more Labels with Ctrl-Click. Press on → (or press to play them).
- Slider Lines
-
Lines can be moved with the mouse. The lines have different colors:
-
Red – Octaves of the fundamental
-
White – Harmonics that are not octaves
-
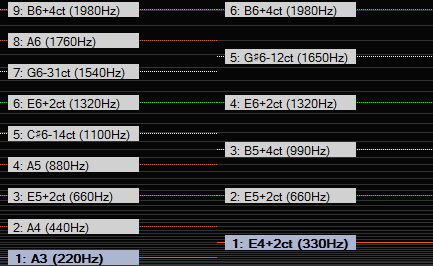
Green – Harmonics that perfectly match the harmonic of another slider on the screen.
For example, Figure 3.23 shows two sliders whose interval forms a perfect fifth. The frequency of the second slider is exactly 3/2 times that of the first slider. Every third harmonic of the first slider matches every second harmonic of the second slider.
-
- Overtone Sizer Handle
-
The handles appear when you move the mouse over a slider. You can grab the handles with the mouse and move them. The Overtone Sizer Handle controls the number of harmonics (or overtones) shown for this slider.
- Undertone Sizer Handle
-
This handle controls the number of undertones shown for the corresponding slider.
- Move Slider Handle
-
This handle allows you to move the frequency or the time position of a slider. When the piano is vertical, moving this handle up or down has the same effect as moving a slider line with the mouse. Moving the slider left or right will leave the slider at the same frequency, but move its start and end position in time.
Many aspects of sliders can be controlled through the Overtone Sliders Toolbar. If the toolbar is not visible, you can enable it by clicking on → → . The toolbar settings are explained on the Note Sliders settings page.
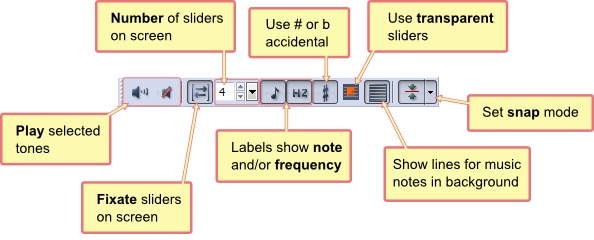
You can set the number of shown sliders on the toolbar, or on the Note Sliders settings page. There you can also choose to how display the labels of each slider, and whether to show the note name and the frequency value.
The following table lists the various mouse commands that you can use to manipulate overtone sliders. Refer to Figure 3.22 for the slider elements.
| Mouse action | Effect |
|---|---|
|
Change frequency |
|
| Click + Drag Line | Move line. If snapping is enabled, the line will snap to the nearest tempered tone or the nearest spectral peak. |
| Shift + Click + Drag | Move line in 1 cent increments. This allows more precision than the normal way of moving. |
| Control + Shift + Click + Drag | Move line in 1/4 cent increments. This allows the highest amount of precision. |
| Double-click in empty space |
Move fundamental of slider to that position. This is useful when the slider is outside the visible range. |
|
Change frequency or time position |
|
| Click + Drag Move Handle | Move time position or frequency position of slider, depending on the direction of the move. |
|
Change number of displayed over- and undertones |
|
| Move Overtone Sizer | Change the number overtones (or harmonics) that are shown for this slider. |
| Move Undertone Sizer | Change the number of undertones (or sub-harmonics) shown for this slider. |
| Double-click on Over- or Undertone Sizer | Reset number of over- or undertones to zero. |
|
Snap line to reference frequency |
|
| Alt + Click + Drag | Move line, but with reversed snapping behavior. For example, if snapping is enabled, holding Alt while moving the line will disable snapping, and vice versa. |
| Control + Click + Drag | Move line and snap to nearest line on the slider to the left, or the slider that currently has the focus. This is very useful to construct specific intervals. For example, to create a perfect fifth, snap the second harmonic of one slider to the third harmonic of another. |
| Control + Alt + Click + Drag | Move line and snap to the nearest line on the slider to the left, even if the focus is on a different slider. This is useful for quickly constructing scales. |
|
Other commands |
|
| Right-click on Label | Open Context Menu for this slider. |
Table 3.4. Overtone Slider Mouse Commands
The labels of the overtone sliders show information about the corresponding frequency and note, but they also serve as buttons that allow playing back the corresponding tone by clicking on them. This is explained in the section called “Selecting Tones”.
Once you have clicked on a slider label, that slider has the input focus and you can use the arrow keys on the keyboard to quickly move up and down the harmonic series.
When moving sliders, it can be useful to snap the manipulated line to some reference. This may be a music note, a nearby peak in the spectrum, or another slider. You can control the current snapping behavior on the toolbar, on the slider settings page, and by using keyboard modifiers when moving a slider as explained in Table 3.4, “Overtone Slider Mouse Commands”.
By default, sliders are fixated to the screen. When the underlying recording moves in time, the sliders stay at the same position on the screen. This allows you to use a small number of sliders as a reference, for example when practicing pitch, or when measuring the overtones in a sound.
The Sliders can also be fixated to the Timeline (when the option “Fixate note sliders on screen” is not checked). In that case each slider has a specific start and end time, like the notes in a piece of music. This can be used to transcribe the notes in a recording, or to construct new compositions or scales. In this mode the Timeline shows a miniature view of all the note sliders in a recording:
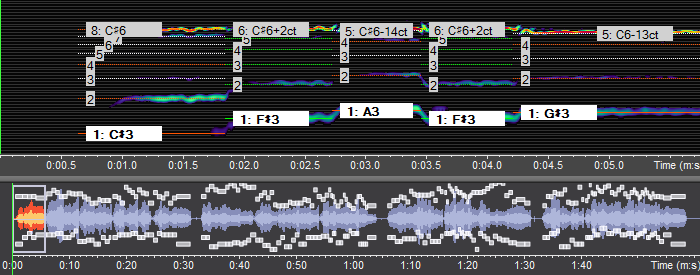
Figure 3.25 shows a recording that is about 2 minutes long. In the upper part of the image, the spectrogram shows the first five seconds. The lower part contains the Timeline with on overview of the entire piece, including a miniature view of the Note Sliders. The lower line shows the fundamentals, and the upper line shows the highest overtones for each note.
- Insert note slider at selection
-
When the sliders are fixated to the screen, you can simply add more sliders by increasing the number of sliders on the slider settings page, or on the toolbar. This doesn’t work when the sliders are fixed in time. Instead, you can select a period of time and then click on → . The slider will be inserted for the selected time period, and it will have the frequency of the most common fundamental of this period. If you don’t see the new slider, scroll the frequency scale or zoom it out.
- Use Note Transcription Tool
-
To speed up the workflow of selecting a time range and inserting a new slider for consecutive notes, you can use the in the menu. When the tool is activated, the mouse cursor will change to have a note symbol:

Now you can simply click on the boundaries of consecutive notes on the spectrogram, and the transcribe tool will insert a new note slider with every click.
To leave the transcribe tool, you can double-click, right-click, press ESCAPE, or press the keyboard shortcut for the transcription tool (which by default is ).
- Delete selected note sliders
-
This command will remove any sliders in the current selection without affecting the audio data in this time period.
- Space sliders evenly across selection
-
This command ensures that the sliders in the current selection all have the same width and are adjacent and non-overlapping.
- Sort sliders by pitch
-
This command may reorder the selected sliders such that they are sorted by their fundamental frequency, where the slider with the lowest fundamental will come first. This can be used, for example, during the construction of scales.
- Use lowest undertone as fundamental
-
If a slider has some undertones (in other words, if the Undertone Sizer Handle has been drawn down), this command will swap the lowest undertone and the fundamental.
If you want to practice singing specific patterns or compositions, you can click on the sliders in one window to control the single slider in another. To understand how this works, first close all open windows by clicking on → . Then open two new windows by clicking on → twice. Arrange the windows by clicking on → . Now create three note sliders in the first window and one note slider in the second window. Move the sliders in the first window so that they have different frequencies. Then click on their labels. Note that the slider in the second window always jumps to the label on which you clicked in the first window.
When you load an existing recording in the first window, and have a new recording in the second window, the practice mode can be used to practice the pitch and timbre of individual notes in an existing piece one by one.
When a recording that contains Note Sliders is saved, the sliders are automatically saved in the file for most file formats. However, it is also possible to save the sliders into a separate file, for example to save the note track after a file has been transcribed. This is described in Section 3.3.3, “Loading and Saving Overtone Slider Layouts”.