
Editing Audio Files
This section explains how to perform editing operations such as cutting and copying, inserting silence, fading, and normalization. Most of those commands are found in the Menu. Some also have toolbar buttons, and all of them can be accessed through customizable keyboard shortcuts.
The and commands revert or restore the last action that has been performed. The commands can be found in the Menu and on the Toolbar. The toolbar buttons for Undo and Redo can show a history of all commands.
The clipboard commands , and work mostly like you would expect from any other program. You can select a parts of your recording, or the entire file, and copy or cut it. Doing so will put the copied section on the clipboard, so that it can be pasted elsewhere.
Once you have copied or cut a piece of a recording, you can insert it with the paste command. If you simply place the cursor somewhere and paste, the audio data will be inserted at this position. If you make a selection and paste, the pasted audio data will replace the current selection.
Pasting across files only works when the receiving file is an empty new file, or if the files have the same sampling rate and channel format. VoceVista Video Pro does not perform any automatic file format conversions during paste.
This command deletes the current selection. If nothing is selected, the entire file is deleted. This can be useful if you want to quickly clear the screen when using VoceVista Video Pro for practice.
If you deleted something by accident, always remember that you can use the command to revert your action.
This command does the opposite of . Instead of deleting the selected part of a recording, it deletes those parts that are not selected, which can be used to trim unneeded parts before and after a recording.
This command applies to the current selection or, if nothing is selected, to the entire file. Normalizing a recording will raise its amplitude such that the loudest part of the selection will use the largest possible value of the current file format. This can be used to raise the volume of very quiet recordings. It can also be useful to normalize recordings before sharing them with others to ensure a consistent volume across multiple files.
However, normalization cannot substitute a good recording that was made with a properly adjusted microphone. Normalizing is similar to increasing the brightness of a photograph that is too dark: no new information is added, the available information just becomes slightly easier to see or hear.
Also, since normalization uses the loudest part of a selection as a reference, loud noises in the recording will prevent successful normalization. Hence if loud noises are present, it may be necessary to delete them before normalization.
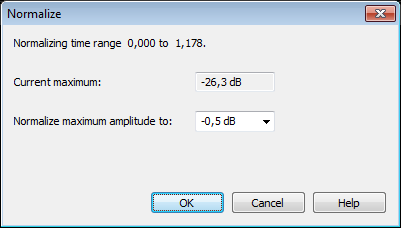
- Current maximum
The largest intensity of the current selection.
- Normalize maximum amplitude to
This is the new value that the current maximum will be raised to. If the current maximum is already equal to or larger than this value, nothing will happen.
This command replaces the current selection with silence. This is different from the command in that the recording retains its length when is invoked, while with Delete, the recording is shortened.
This command will insert silence at the current cursor position. It will open a window where you can specify the duration of the silence that you wish to insert. If you later wish to quickly insert the same amount of silence again, you can press the shortcut for the command.
These commands will change the volume of the current selection so that it gradually fades into zero. If you have copied and pasted part of a recording to a new file, the fade commands can be applied to the edges of this segment to avoid any loud pops or clicks at the beginning and end.