
Markers
Markers are only available in VoceVista Video Pro.
Markers allow you to set bookmarks in files, and to add descriptions to them. This allows you to manage large collections of recordings and to find parts of interest again. Here is a screenshot of a recording with markers:
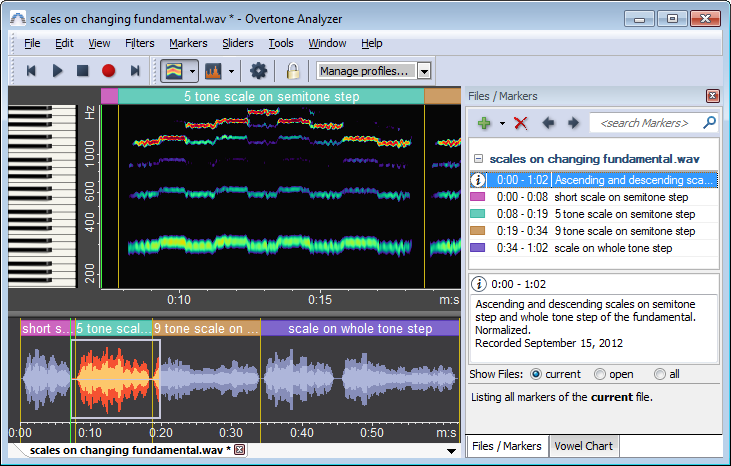
Figure 3.20 shows an audio file that includes a number of separate sections. Each section has been marked and labeled with a marker. The “File and Marker View” on the right shows a list of all markers and can be used as a summary and a table of contents of the file.
The File Description is a special type of marker that is automatically added to every file. You can use it to add information that applies to the whole file, such as where it was recorded, when, and with whom. The File Description marker is always the first entry in the marker list of a file, and it has the  icon.
icon.

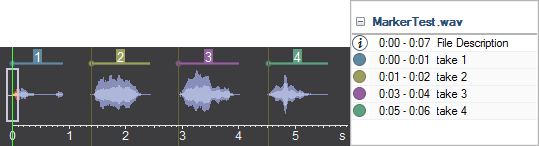
Every time you press record, record for a while, and then press stop, an Auto Marker is added to mark this last recorded segment. Auto Markers have a circle icon on the Marker List. Each segment is called a “take”, and takes are numbered.
By default, 0.5 seconds of silence are added after each take. This can be changed in the Advanced Settings.

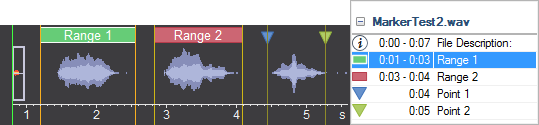
A Range Marker marks a period of time with a beginning and and end. To add a new Range Marker, select a time period, and then click on → . Range Markers have a rectangular icon on the Marker List.

A Point Marker marks a point in time. To add a new point marker, click somewhere on the Timeline or the Spectrogram to position the Time Cursor and reset the selection. Then click on → . Point Markers have the triangle icon. They can also have the “Thumb up” or “Thumb down” icon. There is no difference between the Thumb Markers and regular Point Markers except for the icon.
To jump back and forth between markers, click on → or . You can also use the and keys for this. When you press or , you will jump to the previous or next marker and zoom to it, so that the entire time range of the marker is visible and selected.
You can click on a marker on the Marker List to jump to it, or double-click on it to select its time range and zoom to it.
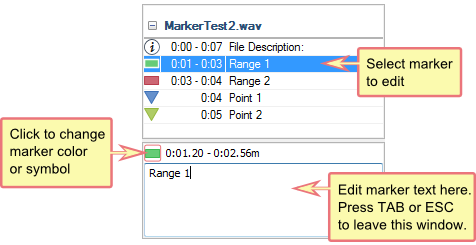
You can edit the text and color of a marker in the lower half of the “File / Marker List” window . If this window is not visible, you can bring it up by clicking on → .
To change the time range of a marker, simply move it with the mouse on the Timeline. You can also click and drag the edges of a Range Marker to change its start or end time.
You can toggle the visibility of individual marker types with the and commands in the menu.
The search box at the top right corner of the “File / Marker List” window allows you to search for file names and for marker texts that contain specific words.
At the bottom of the window are three buttons that allow you to switch the scope of the search between searching all files, or just those that are currently loaded.