
Scrolling and Zooming
VoceVista Video Pro is designed to make it easy to change parameters, and to see the effects of those changes immediately.
The most important parameters that are changed frequently are the displayed time range,
and the displayed frequency range.
The other frequently changed values that affect the display are the dynamic range
of the Spectrogram and Spectrum, and the dynamic range of the Waveform and Timeline.
There are various ways to change those, but one of the fastest is to point at an item, and
then to scroll (shift its range) by clicking and dragging,
or
to zoom (expand or compress its range) by using a zoom gesture, the mouse wheel, or the 1 and 2 keys.
If you don’t have a mouse wheel, you can point at the scale or window to be zoomed and use
the two-finger gesture for scrolling and zooming on your touchpad. Generally this consists of moving two fingers up or down on the touchpad.
Another way to zoom and scroll is to tap the and keys on your keyboard.
The following image shows all areas that can be manipulated by scrolling and
zooming:
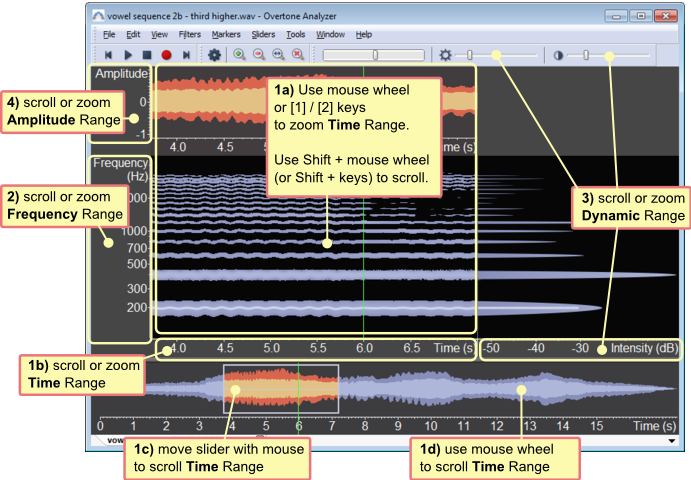
Because the time range of the Spectrogram is the most frequently changed range, there are many different ways to manipulate it. Try out the various ways of scrolling and zooming the time range with the mouse shown in Figure 3.2. Moving the Time Range Slider (1c) or clicking on the Timeline (1d) is for navigating quickly to any part of the recording, while scrolling the time scale (1b) is much more precise for small adjustments.
The time range can also be manipulated by the forward and backward buttons and the zoom buttons on the toolbar, or by the entries in the menu. You can also use Markers to bookmark specific parts of a recording and return to them quickly.
You can change the frequency range by scrolling and zooming the frequency scale (2). You can also set precise values on the Scale settings page, or on the Scale Range toolbar (this toolbar is not shown by default and needs to be enabled).
The displayed dynamic range determines the range of intensities shown on spectrogram and spectrum. It can also be set on the Colormap editor. It can be changed by scrolling and zooming the spectrum intensity scale, or by dragging the brightness and contrast sliders on the toolbar (3).
This setting determines the dynamic range shown on the Waveform and Timeline. You need to enable the Waveform in the menu to see the amplitude scale.
The Timeline itself can also be zoomed by holding while using the mouse wheel (or the mouse wheel emulation keys) on the Spectrogram or the Timeline. You can also enable the in the menu and use that to change the Timeline zoom.
To reset the zoom level of the Timeline, click on → .
The following table lists the mouse commands for scrolling and zooming, and where they can be used:
| Command | Effect | Can be used on |
|---|---|---|
| Left click and drag | Scroll | any scale (Time Scale, Frequency Scale, Intensity Scale, Amplitude Scale) |
| Use mouse wheel | Zoom | any scale, Spectrogram |
| Use two-finger scroll gesture on touchpad | ||
| Press the and keys | ||
| Shift + mouse wheel | Scroll time range | Spectrogram |
| Ctrl + mouse wheel | Zoom the Timeline View (instead of zooming the time range of the Spectrogram) | Spectrogram, Timeline |
Table 3.1. Commands for scrolling and zooming